[Preface: I plan to create a video tutorial and a minimal example which can be downloaded from Github. At the moment I am waist-deep in writing my dissertation and so that project will have to wait. Until then, this post should get you started if you’re interested in becoming a “Maker”*.]
Why Make is the ultimate tool for reproducible research
I love GNU Make.
This is a tool that I never knew I needed until I discovered it.
Make is a free and open-source program maintained by the GNU project, and it is the ultimate software for doing reproducible science.
Make not only keeps code, data, and output separate1, but it will automatically update multiple types of output when either the code or data change.
This means that you do not need to wait until an experiment is finished to start making plots or writing - you can begin right away, and know that your output will stay up-to-date as you collect more data or change your approach to the analysis….it feels like magic.
Best of all, Make is language agnostic, so it can run any program compatible with a Unix shell.
One can seamlessly integrate scripts written in different languages, like Python, R, SQL, and Bash.
You could even run SAS from the command line if you are so-inclined.
Everything in this post uses R as an example, but the principles are exactly the same if you use Python.
I think reproducibility can become a sort of cult, so I try to be careful and not preachy about these kinds of tools.
Plenty of excellent science has been done using Word and Excel, and there are plenty of other ways to make research reproducible, like writing a simple text file containing instructions on how to run the code.
However, in my opinion, Make is the biggest and best of reproducibility hammers.
I’m really grateful for the people who wrote it, and for the free resources which have helped me learn to use it.
What about R Markdown, Jupyter notebooks, or LaTeX?
Most scientists who are interested in reproducibility agree that using any document preparation system is a big step improvement over MS Word.
While R Markdown, Jupyter notebooks, and LaTeX are excellent ways to build outputs, it’s rare that an entire project can be jammed into a single .Rmd document.
We often need to re-use output files in multiple places. For example, a research project might generate a presentation for students, a report to funders, and a final manuscript. It’s likely each document will use some of the same results - figures, tables, models, etc. If we make any changes - for example, by adding new data or by changing a regression model - the figure or table needs to be updated in multiple places. That means more work and more chance for mistakes.
Make eliminates this problem.
You are probably wondering, “If Make is so great, why isn’t everyone using it?”
My personal view is that everything has a price, and he price for reaping the benefits of Make is pretty steep.
It’s frustrating to learn, and it can be tricky to use even after you’ve learned the basics.
Make has no graphical user interface, so you need to have at least a basic familiarity with the Unix command line.
You also have to know how to run scripts non-interactively.
Neither of these are too difficult, but I am sure they scare a lot of people off.
If you are not familiar with non-interactive script execution, I will cover this below in Running scripts in non-interactive mode.
Unfortunately, even if you know how to do these things, using Make itself is not so simple.
A Makefile is very challenging to debug because many mistakes will cause it to fail silently, with no error message.
When you do get an error message, they are often grisly and hard to interpret.
I once spent spent more hours than I care to admit scanning a Makefile line by line, only to discover that the problem was a single place where I’d used a dash instead of an underscore.
At first blush, Make seems very crude compared to the chique user interface of the tidyverse and RStudio or VS Code2.
I encourage you not to be fooled by this.
I feel that if you learn Make, you will NEVER go back to the old way.
Using a Makefile makes your work easier and more efficient, and - most importantly - you will know that it is correct.
How it works
If you are still reading, I’ve at least convinced you that Make is worth learning more about, if not adopting completely.
To convince you further, it helps to know how this tool actually works.
The core concept is actually rather simple.
Make behaves like a “helicopter parent” - it watches its “children” and it knows if anything about them changes.
It keeps the project up-to-date by building target files from prerequisites using a recipe.
There are no opaque caching mechanisms or binary intermediate files.
Make simply compares the file modification times of the targets against those of the prerequisites.
When you open a terminal and type make, the program will look for any targets which are out-of-date and re-build them.
Critically, Make will not re-build targets which are already up-to-date.
This saves you time and computational resources by re-running as little code as possible.
Figure 1 below is an example “dependency graph,” depicting the relations between targets (red) and prerequisites (green):
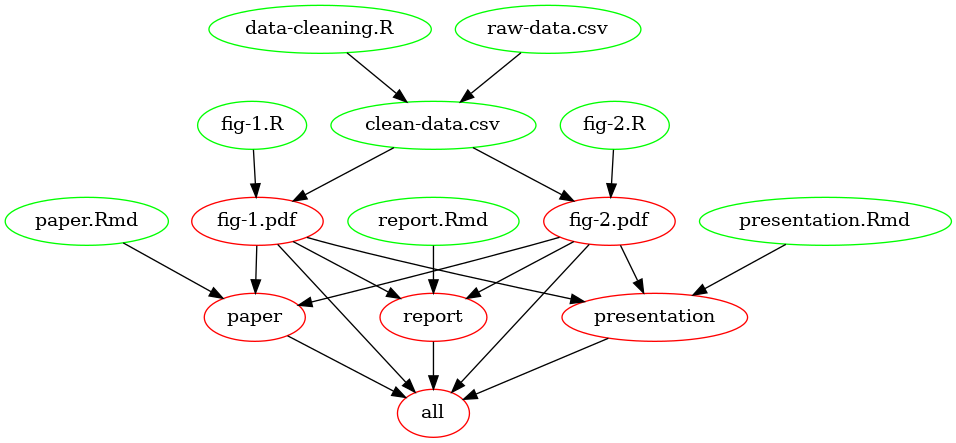
Figure 1: Dependency graph of a minimal example Makefile.
You tell Make which target files depend on which prerequisite files and how they need to be built.
This means you must write the rules very carefully.

You store the rules in a plain-text file named Makefile (no file extension!).
The Makefile lives at the root directory of your project, so all file paths are relative to this location.
Writing rules in a Makfile
The user of GNU Make writes plain-text instructions called a Makefile.
Each set of instructions is called a rule. There are 3 components to a rule:
a single target3
one or more prerequisites
A recipe to build the target file from the prerequisite(s).
Here is syntax for the general form of a rule:
Note that the white space before the recipe is a TAB character. If you use two spaces instead, this will not work. Pretty archaic, but that’s just the way it is.
To be a little more specific, here’s an example of performing a common task (wrangling a data set and writing a cleaned-up version to disk):
This rule states that the output (clean-data.csv) should be built using data-wrangling.R and raw-data.csv by running the R script data-wrangling.R.
Make now knows how to build the target file and it watches for changes in the prerequisites.
In the above example, the R script will read raw-data.csv, run the wrangling operations, and save the result as clean-data.csv.
If a prerequisite file is updated, Make automatically re-builds all other outputs which depend on that prerequisite.
So you could have another rule which builds a model or makes a figure using (clean-data.csv), and using Make means that if either the R script or the data file gets updated, clean-data.csv needs will be re-built, automatically triggering a re-build of (for example) model.rds and then figure.pdf.
Importantly, Make will not do anything for rules which are already up-to-date.
This eliminates the need to re-run time-consuming code which has not changed.
Recipes can also contain multiple commands, with one on each line. I try to avoid this to keep the rules very modular, but there are definitely use cases which require multiple commands. For example, you could create a data file and then zip it with other stuff to send to a collaborator4:
collaboration-packet.zip: data-wrangling.R raw-data.csv paper.Rmd comments.txt
    Rscript data-wrangling.R  clean-data.csv
    7zip collaboration-packet.zip clean-data.csv paper.Rmd comments.txt
This creates the file collaboration-packet.zip in one step, making it easy to reproduce when you update anything.
The rest of this tutorial will focus on using R because that is where I am most comfortable and where I think most researchers live these days. However, keep in mind that the same concepts apply for Python, Bash, or other languages. The main difference will be in the way command line arguments are passed into and out of the scripts.
Specifying which targets to build
When you call make from the command line, Make will look for the first target and try to build it.
You can actually define metatargets (or “dummy targets”) which are not actual files, but more like an abstract goal of sorts.
A customary way to use these is to name a single metatarget “all” and then list all the files you want to build as dependencies of it, but without any recipe.
You can nest metatargets under one another (as suggested by Zack Jones), but I find this gets confusing so I prefer to just use the all metatarget and then just create and expand variables for other lists of files I want to condense.
The all metatarget should always be the first target to appear in the Makefile.
It may appear after variables and comments and the include statement, but it should always come before any rules.
For example, the following line would keep tabs on all three “finished products” and only re-run the code that is required. If any of these files are already up-to-date, Make will not waste your time and computational resources by re-running the code needed to build them.
If you do not use the all metatarget, or it does not come first, when you call make from the terminal it will only try to build the first target.
Alternatively, if you just want to build a single target, you can pass it in as an argument from the command line:
Types of rules
There are a few types of rules. Explicit rules are like the one demonstrated above: they explicitly say how to build a file.
There are also implicit rules which are build right into the core of Make. These mostly deal with compiling C code and are not really relevant for our purposes.
Finally, there are pattern rules. These are the most useful for us.
I recommend that you only use explicit rules as you first dip your toes into the Make ocean.
These are a lot easier to debug because you can identify which rule is not working right away.
When you have a pattern rule with 2, 7, or even 50 figures to build, all from different scripts, it can be harder to find which is the offending file.
Once you get the hang of writing rules, move to using automatic variables and finally pattern rules.
I’ll explain these next.
Automatic variables
Automatic variables is the term used by Make’s authors to mean a type of variable that can be used in any Makefile recipe
Their purpose is to give you an easy way to reference other parts of the rule, either the target or prerequisites.
These also let you DRY5 your code out (reduce duplication).
Built-in variables are accessed using the $ operator.
You may also use curly braces (OR parentheses….😡) around the variable name, but for automatic variables, I like to omit the braces, since they are just a single character.
The 2 most useful automatic variables are $< (first prerequisite). and $@ (target).
Recall the rule we wrote above:
We can use automatic variables to re-write this as:
This will eliminate the chance for typos in the recipe because the names of the two files are passed directly into the recipe when you call make at the command line.
At first glance, this doesn’t seem like a huge benefit.
But the most important implication of using these variables is that you can use them in pattern rules.
In my opinion these are one of Make’s best features.
Pattern rules
A lot of times we might use the same workflow to build multiple figures.
We take an input data set and pass it to an R script which builds and saves the plot.
If we do this for multiple plots, we can re-use the same recipe to build all of them - the only thing that changes is the “stem” of the file.
In pattern rules, the % operator is used as a placeholder for the patterns.
Here is an example: let’s say we have 3 figures to build, and each one uses a different R script.
I prefer not to name figure scripts using numbers because these can change if you shuffle things around in the manuscript.
Also, you can’t learn anything about the figure’s nature from a number, so when looking for a given plot you will have to keep opening every file until you find the one you want.
Instead I will use very descriptive names.
Again, I digress, so let’s return to the pattern rules.
Here is what this would look like with explicit rules and automatic variables:
barplot.pdf: barplot.R clean-data.csv
  Rscript $< $@

scatterplot.pdf: scatterplot.R clean-data.csv
  Rscript $< $@

histogram.pdf: histogram.R clean-data.csv
  Rscript $< $@
That’s a lot of duplicated code. Here is what it looks like with a pattern rule:
So long as there are files which have the same stem and the extensions .pdf and .R, the % will allow three rules to be constructed from the single rule you wrote.
Much better. And you can easily imagine how this gets even more valuable if you have 30 or 40 figures to build in a given project.
Pattern rules is where you have to be really careful with Make.
If it does not find any matching patterns, the target will collapse to an empty string and nothing will happen.
You will not get an error message telling you something is wrong or that no files were found - since the pattern didn’t match any files, Make believes everything is up-to-date and nothing needs to be done 😱.
There are some other automatic variables including ? (all dependencies newer than the target) and $(*F) (file-only name of target, without directory before), and others.
However I usually find that $< and $@ are all I need. For more on automatic variables, see their official documentation.
Scooping up other dependencies for pattern rules
In the pattern rule example above, all the figures depended on the same data set. But often times that isn’t true. So how can we still use pattern rules when the prerequisites are different?
The answer is a brilliant feature of Make: you can have multiple rules for the same target, so long as only one of them contains a recipe. In other words, you can write a “partial” rule that only specifies dependencies without saying how the target file should be built. When scanning your Makefile, Make will “scoop up” these dependencies and combine them all into a single rule to build the target. So the code
could also be written as
Make will add the second rule to the first and give the same result.
Obviously you wouldn’t want to do this for a single explicit rule - it would be silly to split this one apart. The value is when you want to use the same pattern rule for multiple targets which have different dependencies. Returning to our example for building multiple figures, let’s say each one depends on a different cleaned data file.
Here is how it looks with explicit rules:
histogram.pdf: histogram.R clean-data-1.csv
  Rscript $< $@

scatterplot.pdf: scatterplot.R clean-data-2.csv
  Rscript $< $@

barplot.pdf: histogram.R clean-data-3.csv
  Rscript $< $@
And here is how it looks when we distill out the commonalities among the recipes and then explicitly declare the data dependencies for each figure:
%.pdf: %.R
  Rscript $< $@

histogram.pdf: clean-data-1.csv
scatterplot.pdf: clean-data-2.csv
barplot.pdf: clean-data-3.csv
I really prefer this approach because it combines the concision of pattern rules with the clarity of explicit rules. A win-win!
Advanced Make: variables and functions
Once you grasp the concept of rules and can use automatic variables, there are a number of ways to harness more of Make’s power.
These include variables and functions.
Make is actually its own language.
Most of its commands look similar to those used in Bash, which seems nice at first but actually gets pretty annoying.
It’s of like trying to learn Spanish while somebody is speaking Portugese next to you. They are just similar to make you think they are the same language, but there are important differences.
For example, $( ) is used for command substitution in Bash but for variable expansion in Make.
Because it is a language, Make has some built-in functions that you can use to make your code more concise and efficient.
It also allows you to set variables at the top of the Makefile, or even in an external file.
I prefer the latter approach because it keeps the Makefile less cluttered, and I’ll cover this further below. But let’s stay focused and talk about how variables work.
Setting and expanding variables
Many times you want a target/output to depend on many, many inputs.
You don’t really want to manually type all of the file names into a rule, so is another perfect example of a place to DRY your code out.
Instead of hard-coding the .csv file names, you can dynamically reference them in a few different ways.
One way is to create your own variable. This works exactly the same as creating a variable in an R or Python script…..when you reference the variable name in a rule, Make finds the ‘meaning’ of that variable and inserts it into the rule.
Like Bash, variables in Make are traditionally written in all caps and assigned using the = operator. They are then accessed (expanded) with the$() syntax. This is another place to be careful with spaces; they are treated as separators and you should NEVER use spaces in your file names (see more about this below.
Variables should be set at the top of the Makefile, or in an external file that can be read with the include directive.
Personally I use the latter method because otherwise the Makefile can be easily cluttered (see more on this below in including external files .
Here is an example which combines several prerequisites into one varible:
Then you could expand this variable in a rule:
Make will expand the ALL_CSVS variable to read this rule as:
clean-data.csv: data-cleaning.R file-1.csv file-2.csv file-3.csv
  Rscript data-cleaning.R clean-data.csv
This is pretty useful when we want to be very explicit, but we can take it a step further so that you do not need to update the ALL_CSVS variable every time you crete a new data file.
We can programatically find all the files we want in one of two ways: using text functions built directly into Make, or using the shell function built into Make. The shell function will run any shell command right from the Makefile.
First, let’s look at Make’s built-in wildcard function. Functions are executed in Make using the same syntax for expanding variables (again, kind of confusing, but stick with it). The syntax is $(function arguments). The wildcard function will find any files matching a pattern. Note the syntax:
This is not a regular expression - the * operator is a total wildcard, like in Bash. This works OK, but one reason I don’t really use wildcard is that it cannot search recursively. So if you have a highly nested directory structure this will not be much help.
Now let’s look at the second way to find files dynamically.
I usually organize data directories by data type and then by date, so I might have several directories containing the same sort of data. In this case, it is shell to the rescue because we can use the find command in Bash to get the list of files that we need.
Let’s say we have the following directory structure:
data
|
-compression-testing
   --2021-08
     |-compression-data_2021-08-01.csv
     |-compression-data_2021-08-24.csv
   --2021-09
     |-compression-data_2021-09-06.csv
     |-compression-data_2021-09-18.csv
|
-particle-size-analysis
_....
We can recursively search using find and either a wildcard or a regular expression (if we pass an argument to the -regex flag.)
When we expand $(ALL_CSVS) in a rule, it will run the find command inside the ./data/compression-testing/ directory and all its sub-directories to return a list of files: compression-data_2021-08-01.csv compression-data_2021-08-24.csv compression-data_2021-09-06.csv compression-data_2021-09-18.csv.
This requires a bit more typing, but it is much more robust than Make’s wildcard.
You can even expand other Make variables right inside the shell command.
Substituting text strings and file extensions
In C programming (the original applicaton of Make), a very common task is building one file from another one having the same “stem” but a different extension.
You can do this with the subst or patsubst functions.
There are a number of other helper functions to slice and dice file names, helping you obtain the stem, basename, or extension. Unsurprisingly, Make uses different conventions for what these terms mean than are normally used in Bash, R, or Python. I won’t harp on the details, so read the documentation if you want to learn more.
subst and patsubst are really useful when you need to convert one kind of file to another. For example, I did a project that required converting hundreds of .ply 3D meshes to .tif raster files. Each one would take several minutes, so I didn’t want to read all of them into a list using R because whenever I added new files, I would have to re-run the entire script, taking several hours. Instead, I wrote an R script that would accept 2 command line arguments (the input file and the output file) and a pattern rule to call that same script. This way, Make knew to convert the new files as I added them, but not to bother converting files that already existed. Here is how it looked:
There is one more problem with this approach….because this is a pattern rule, if the file [stem].tif doesn’t exist yet, the pattern rule will not match any of the .ply files because there is no corresponding .tif. The rule will collapse to an empty string for that particular file, without alerting you. So, you need another way to alert Make that this file should exist. The best way is to create a varible that contains the relevant files - but as usual, you don’t want to do this manually. One way is to write a very simple Bash or R sript to find the existing .ply files and spit them back to stdout. I did this for a while until I became better at using Make’s built-in text functions. These days I create a variable in mf-vars.mk and use subst to swap out the file extension. You can expand your own variables inside of functions too, so you can easily reference other lists of files.
subst and patsubst are vectorized, so there is no need to write a loop.
The syntax for subst and patsubst is $(subst from,to,text). As usual, don’t use spaces!!!!!
EXISTING_PLYS = $(find ./data/mesh-files -name "*.ply*" -type f)
TIFS_TO_BUILD = $(subst $(EXISTING_PLYS),ply,tif)
This task is so common that there is actually a shortcut, assuming you use a variable to capture a list of the files:
$(var:suffix,replacement) will perform the swap for you. For example, we could build the .tif names from the .ply names with $(TIFS_TO_BUILD:ply,tif).
Using variables to re-define shell commands
You can even use variables to set options and re-define shell commands. My favorite use (which I learned from Peter Baker) is to set the options for running R non-interactively. The program Rscript is what will execute your code in a self-contained (non-interactive) session. There’s an older version called R CMD BATCH but this has been deprecated. If you have R installed, both of these should already be on your machine.
The default options for Rscript are to run a user-level .Renviron file, to save the workspace image as an .rda file, and to restore this .rda in the next session. Saving your workspace is NOT recommended for a reproducible workflow, and it will needlessly clutter your directories with useless output files.
So we want to turn this off.
That means every time we call Rscript in a recipe, we have to type Rscript --no-save --no-restore --no-site-file.
This is long and annoying and violates the DRY principle.
There is a more concise version which shuts down all external communication between the R session and the rest of your computational environment: Rscript --vanilla (for all their questionable API choices, R core does have a sense of humor, don’t they? 🍦)
Unfortunately, using the --vanilla flag will also prevent R from reading your local .Renviron file.
This will cause you endless frustration on Windows because R will not be able to find your R packages.
I’ll explain a workaround for this in the next section.
OK, back to re-defining commands with variables.
Instead of writing a long series of flags to accompany the Rscript command, it is easier set a variable which will expand to run Rscript with the options we want.
Then when we write a rule, we just expand the R_SCRIPT variable in the recipe:
Make will read interpret this as
clean-data.csv: data-cleaning.R raw-data.csv
  Rscript --no-save --no-restore --no-site-file data-cleaning.R clean-data.csv
Pretty slick.
Finding R packages in non-interactive mode
Like nearly everything else on Windows, this is a real pain.
R Studio is so well-engineered that you never really have to think about where your R packages live.
But when you exit the warm, friendly confines of RStudio and venture into the shell, it gets a little dicey.
When executing code, R will look for an environment variable called R_LIBS, which contains a path to where you have R packages stored.
This variable is created automatically by RStudio, but it will not exist when you run scripts using make from the command line
So you will need to create a .Renviron file to tell R where to look.
You can call usethis::edit_r_environ(scope = 'user') to create a blank.Renviron file, or do it manually. The file should live at your project root and you should set a single variable at the top, with the fill path to where your R packages live.
You can find this directory in RStudio by calling .libPaths().
Copy that path to the .Renviron and use the = operator to assign its value to the R_LIBS variable. For example,
R_LIBS=C:/Program Files/R/R-4.2.0/librarySome people advocate against using .Renviron files for reproducible research because they are accessed invisibly and will not work on somebody else’s machine.
I definitely see their point, and actually a better way to manage packages is using something like renv. However, if you include the .Renviron in your git repository, another person could simply change the file path in the .Renviron file to match where they store their own packages. While not perfectly kosher, this seems a relatively small violation in my mind.
I found that using renv was a little annoying to maintain while I was working on a project, so now I just use the packages from my main R library and then initiate renv as a safeguard when the project is almost complete.
If you are having trouble with this process, RStudio has a good blog post about how to configure what happens when you start R, and (if you dare) you can read also it straight from R’s documentation on startup
Finally, R should be able to find the packages and your scripts should run.
Standardizing your pipeline workflow
A lot of times I use one R script to clean a dataset and a different one to make a plot. Technically you could do all of that in a single script, but it can get long, and as I talked about at the beginning you might want to use the same “clean” data set for multiple figures. In this case you are going to need to EITHER copy-paste your data wrangling code into multiple places, or use the same script to build multiple figures.
Neither approach will jive easily with Make, and it will generate some very long scripts which can get hard to debug and borderline impossible to keep track of.
Instead, you can write two pattern rules, one for data cleaning and one for building the figure. Then you can use the “scooping” strategy I described above
# data cleaning pattern rule
clean-data/%.csv: data-cleaning-scripts/%.R
  $(R_SCRIPT) $< $@

# figure-building pattern rule
figures/%.pdf: figure-building-scripts/%.R
  $(R_SCRIPT) $< $@


# data dependencies for each clean data set and figure

clean-data-1.csv: raw-data-1.csv metadata.csv
clean-data-2.csv: raw-data-2.csv
This is a little extra work on the front end and it does result in you having a larger number of intermediate files and scripts.
I still see it as worth the trouble for a number of reasons:
It is much easier to follow the trail of breadcrumbs on how you arrived at a given result.
Having a standard process for doing these tasks has really helped me because it removes ambiguity about how the project is structured.
Although you have more scripts, each one is more modular and much shorter - often less than 50-100 lines. This makes them really easy to debug.
Finally, by chaining the intermediate files together using
Make, if you make a changes in any single place - be it raw data, data wrangling code, or figure-building code - you can rest easily knowing your finished product will be up-to-date.
Get up and running
Running scripts in non-interactive mode
To be able to do anything within Make, you first need to understand how non-interactive execution works.
Rscript is a command-line tool which runs R code non-interactively. The non-interactive workflow ensures that if anything in your script doesn’t work, it will throw an error - it’s safer than running your code line-by-line interactively because your R session always starts with a totally clean slate (assuming you set the proper defaults).
Also, if you are already using R Markdown, non-interative execution the same concept but without splicing written verbiage together with output. All of your R code is sent to the console at once, in a totally fresh R session. This means you have no chance of accidentally running code out of order, referencing variables or options left over from a different session, or generally intervening in any way.
If you are used to running code in R Studio (or R GUI) line-by-line, this is a bit of a mindest shift, but it is well-worth it because you know your result is reproducible (by you, or by somebody else).
One of the tricky things about this approach is that you need to pass in the arguments from Make to your script, in order for the script to know the output file path.
R has a built-in function for precisely this purpose: commandArgs().
The Python equivalent is sys.argv().
When called in non-interactive mode, commandArgs() returns a character vector of the arguments passed in from the command line. These follow the Rscript command and are separated by spaces, just like in any other Bash command.
The result from calling commandArgs() will allow you to pass the file path of the target file straight to whatever function you are using to save the result (for example, readr::write_csv() or readr::write_rds()).
I recommend you keep your scripts simple and only require one prerequisite to be read in. In this case you don’t need any other arguments to commandArgs(), but I still like to use the subsettor syntax commandArgs()[[1]] just to be explicit.
Mind your options here: you should set trailingOnly = TRUE in the call to commandArgs().
If you leave the default trailingOnly = FALSE, R will use the script name as the first argument.
So, you could just leave the default and use the subsettor [[2]] to grab your file path, but I feel this is more confusing.
I actually like to assign the output file as its own variable because it makes things easier to debug later, although you can definitely inline commandArgs() directly to the file writing function.
For example, at the end of your script you can write:
# some code to produce object `clean_data` goes above

# write to disk using `Make`

if(!interactive()){
    output_file <- commandArgs(trailingOnly= TRUE)[[1]]
    message("Output file is: ", output_file_path)
    readr::write_csv(x = clean_data, file = output_file_path)
}
This will print some info about what Make is passing to the R script, making you feel a little warmer inside while you watch from the terminal as Make does your duty work.
Debugging in Make
No sugar-coating here: debugging Make stinks.
As I mentioned above, most problems you have in Make will stem from pattern rules which collapse to empty strings.
Take your time and name your files carefully! NEVER use spaces in your file names (but you already knew that).
Spaces in file names are always a bad idea, but they are especially costly in Make because spaces are read as separators between different files. So if you name a file this is a file.csv, Make will interpret this as a list of 4 files called this, is, a, and file.csv.
Saving the output from the make command
If Make is not running correctly, I like to save the output to a text file so it is easier to read, and you can open it in RStudio for easy searching.
You can simply use the > operator in Bash to re-direct the standard output to a file of your choice:
.out is an easy extension to use, but you could definitely use .txt or anything else you want.
Plus, I get a chuckle out of the file name make.out 😘 😂
The only problem with this is you don’t get to watch the output get printed as it is produced. You can instead use the tee command to show the output and also write it to a file.
The last thing to note is that stderr is not captured with the above. To save stdout to the same file and also print everything in real time, you have to use some more Bash tricks:
The -a flag says to append the file with stderr, after the stdout, as opposed to over-writing it.
I actually use an executable shell script called ./run-makefile.sh which will do all this, with less typing. Here is the contents of that script:
#!/bin/bash

# set variable
OUTFILE=debugging/make.out

# delete old version of file
rm ${OUTFILE}

# add header to timestamp file
echo -e "Running GNU Make; run time: " $(date) "\n\n" |& tee -a ${OUTFILE}


# run GNU make and print results to stdout and also write to file
make |& tee -a ${OUTFILE}

# see solution at https://stackoverflow.com/questions/692000/how-do-i-write-standard-error-to-a-file-while-using-tee-with-a-pipe
Discovering problems with empty variables
I like to make a dummy target called vars_check. This has no prerequisites, so it will be re-made whenever you ask Make to do so. I use this strategy to check that my variables are expanding correctly.
For example, if I set the variable $(ALL_FIGURES) at the top of the Makefile or in mf-vars.mk, I can expand it and then echo the result to make sure it found all the files I want it to.
I use the @ operator to silence the command (i.e. just run it, don’t say that echo is being run) and the -e flag to allow me to use the \n operator as a new line.
When you run make vars_check in a Bash shell, this recipe will print the text “All figures are:” and then a list of the files found when the $(ALL_FIGURES) variable is expanded. If you made a mistake in defining $(ALL_FIGURES), you should be able to figure out why. A common issue is there is no matching pattern, which will collapse to an empty string.
Other debugging help
Another good stratefy is to have Make explain its reasoning a bit more. You can do this with the –debugging flag. If you use –debugging, I recommend the “basic” option which gives you some useful information without the output being too lengthy.
Getting help
To get help with Make’s flags and helpers, call make --help at the command line. This gives you some useful information about how to proceed.
Other miscellaneous tips
These are in no particular order, but they are a sprinkling of “veteran moves” (I’m no veteran Make user, but I like the phrase) to ease some frustrations and help you squeeze the most juice out of Make.
Render finished output
If you are already using RMarkdown or LaTeX to write reports and papers, this is an easy transition.
You can use the -e flag in the Rscript command to tell R that you are not passing in a script file, just a single expression.
You can still use Make’s automatic variables, so it is easy to write a pattern rule which renders all relevant .Rmd files at once. For example, the actual manuscript and some comments to reviewers might be separate .Rmd files which you want to render to .pdf versions. Here’s an example:
You will need to mind the quote marks.
Recall that $< and $@ will expand to strings, but without quotes. So the R session is going to receive the recipe above as
See the problem? Without wrapping the file paths in quote marks, they will be interpreted as unquoted variables, so R will not find them in its current environment.
To use the automatic variables in the above example, you just have to do one of two things:
nest the quote marks as single inside double (or double inside single), or
escape the quotes in the call to
rmarkdown::render().
This will match any .pdf file in the ./paper directory with the corresponding .Rmd source file, and update only the .pdf files which are out of date.
If you are using xaringan or similar packages to build presentations, this approach can be used the same way to render those.
Include external files with include
This is pretty straightforward: just add the command include at the top of the Makefile and add the path to any file you wish to add to the Makefile. That file’s contents will be automatically inserted in the place occupied by the include statement. I use this to include a separate text file containing all my variables. This keeps the Makefile leaner and easier to read because it only contains rules, not long lists of files.
Set some common-sense options
This is a preamble that I borrowed/adapted from https://tech.davis-hansson.com/p/make/. It sets some options for safety. The best one I think is the --warn-undefined-variables flag….this will give you a heads-up when you are trying to expand a variable that doesn’t exist.
I always place the following code at the top of the Makefile (or mf-vars.mk when this file is included).
Run jobs in parallel
One big benefit of Make is that it won’t run code that doesn’t need to be re-run.
However, sometimes code still takes a long time, and you can take advantage of the multiple processors on your computer. Parallelization is notoriously complicated on Windows, and I rarely attempt this in R. However, it is really simple to do with Make - all you have to do is add the -j flag with a number of jobs to run in parallel. Make is smart enough not to run two jobs at once if one depends on the other.
The only drawback to parallelization is that the ouput gets jumbled - Make will print the output in the order it is generated, not in the order that the jobs are started. So if one job takes a long time, it will get “lapped” by other ones. So long as you are not trying to debug anything, this isn’t a problem.
Draw a dependency tree of your project
When you are first learning Make, it’s a goood idea to literally draw this with a pencil and paper.
There is a neat program called make2graph that will analyze your Makefile and create the dependency tree. This is fun, but it’s also useful for debugging because you can directly see the relationships between targets and perquisites. However, if you have more than a few prerequisite files, the graph gets very cluttered. You can make this simpler by just building one target and piping it to make2graph, instead of the entire Makefile.
Getting make2graph installed isn’t too bad, although it has not been updated for a while.
Just follow the instructions at its GitHub repo.
The author (Pierre Lindenbaum) has some neat examples there as well.
Here is the syntax:
If you prefer vector graphics (as I do), you can generate a .pdf instead:
Scan the catalog without running any code
To check what Make would do without actually running the commands, use the -n flag. For example, to see what the program would do if you attempted to build barplot.pdf, call
This will show you the commands that will be activated based on the rule(s) that are present for barplot.pdf and its associated prerequisites.
Writing comments in a Makefile
As for all programming languages, comments are critical in Make. The syntax is pretty concise, so often it is pretty obvious what a rule is designed to do, but it comments help you to remember why a certain file depends on another. You can write comments using the # operator, just like in R or Python. If used at the beginning of a line it will comment the entire line out, and if you use it in the middle of a line it will only comment out the trailing contents:
Keep your Makefile under source control
If you are already using Git, this is a no-brainer. You will be able to restore old versions of your Makefile in the event that you break something, and because it is a plain-text file it jives perfectly with Git and GitHub.
Other resources for learning Make
There are a number of other tutorials on the web about this topic.
I got started with Make by reading some of these, especially Karl Broman’s and the one formerly offered by Jenny Bryan and her colleagues in the famous STAT 545 course.
Here are two others:
- Zack Jones
- Mike Bostock
These tutorials will get you on the road, and these folks are probably more adept Make users than I.
I still decided to write my own tutorial because I thought I could add some new details and demonstrate some tricks I’ve discovered with practice and by reading the official documentation.
Speaking of reading the docs, Make’s online manual is quite helpful, and obviously this is the authoritative guide.
I also recommend the papers Using GNU Make to Manage the Workflow of Data Analysis Projects by Peter Baker and Opinionated analysis development by Hilary Parker.
There is also a good (and free!) O’Reilly book, Managing Projects with GNU Make, which explains Make’s logic and syntax. Unfortunately, it is geared toward people using Make for its original purpose of compiling C code, so the examples are not so relevant for researchers.
Summary
Make is not for the faint of heart, but I think if you embrace this workflow, you will be blown away by its power. I’m not sure if it a faster way to work - at the beginning, it is actually slower - but even if nobody else ever runs your Makefile, it removes all the stress of keeping track of a project as it develops. You have probably heard the saying about how your most frequent collaborator is yourself from 6 months ago…..except you don’t reply to e-mails. This way, no replies are needed - Make does the grunt work so you can focus on doing cool science and not on mundane copy-pasting.
There’s no way I could hit every crevice of Make in one blog post. I am still learning myself, and it is a deep program with a lot of hidden features. However, I hope you enjoyed reading and got inspired to try it out. Don’t feel pressure to jump in head-first and immediately shift your whole workflow - just try to create a minimal example that is relevant to you. Write one or two rules, and you’ll get the hang of it and learn new features as you go.
Make forces you to modularize your code, and to plan the structure of an analysis before you have created a messy pile of haphazardly-named files. Your work will be 100% reproducible and easy to utilize in multiple places. Yes, it might take a bit more time and effort up front - but as one of my baseball coaches used to say, “If you don’t have time to do it right, when will you have time to do it over?”
References
a pillar of reproducible science; see Marwick et al., 2018↩︎
R Studio’s build tools actually supports
Make; you can configure this in the Global Options; but it can only recognize thealltarget so you can’t just build one target….and you aren’t able to use any other flags or arguments. So I always runMakefrom the shell, which is easy to open in RStudio withCtrl+ Alt + Shift + s, or by hittingAlt-t-sin succession↩︎There are ways to tie multiple targets to the same rule, namely double colon rules, but this is complicated and I try to avoid it when possible. It is much easier to think about, write, and debug a
Makefilewhen there is only one file produced by a given recipe.↩︎ideally you could convince them to use distributed version control and
Makewith you, but this is a tall order for most people….↩︎Do not Repeat Yourself↩︎